Posts

Showing posts with the label Arduino projects

Humidity sensor with led alarm | Arduino project
Image
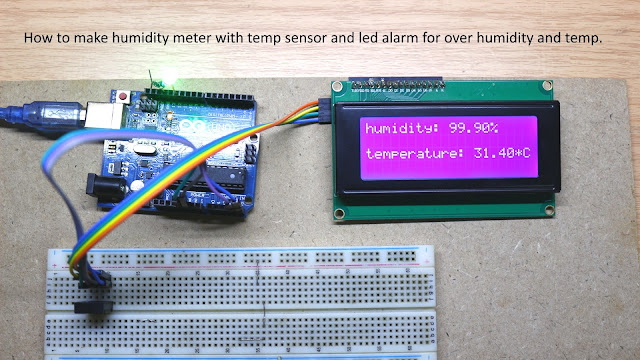
This page contains Arduino Humidity sensor with led alarm source code. This project is good for someone who wants to make a humidity meter or hygrometer with led alarm if humidity and temperature over a threshold. It's easy to make and doesn't require an external power supply, just use power from an Arduino UNO R3 board (USB power compatible with this project). Electronic components list: 1 x Arduino Uno R3 1x 20 x4 I2C LCD display 1 x AM 2320 humidity/temp sensor 1 x 5 mm led ( 2 x if you plan to use led for pin 13 instead built-in led) 1 x 1000 ohms resistor ( 2 x if you plan to use led for pin 13 instead built-in led) Any USB power adapter, 500 mA current at least. Here is the Arduino code: AM 2320 library  https://github.com/hibikiledo/AM2320 LCD display i2c library  https://github.com/fdebrabander/Arduino-LiquidCrystal-I2C-library #include <Wire.h> #include <AM2320.h> #include <LiquidCrystal_I2C.h> LiquidCrystal_I2C lcd(0x3...

How to make an IR toggle switch

Image
Hello, today I will show you how to make an IR toggle switch with Arduino and a Mosfet, it has far more detection range than capacitive touch device and easy to build. The circuit is easy to use and use minimal components to make a job done, now let's start Components list: R1 = 100 ohms resistor R2 = 470 Kilo-ohms resistor R3 = 10 Kilo-ohms resistor R4 =1000 ohms or 1 kilo-ohms IR1 = infrared led IRR1 = infrared receiver led = low forward voltage led, you can find it on any electronic part store Tube1 =Shrink tubing 1 x irf9540n p-type Mosfet If you have the components I list ready, it's time to upload this code to your Arduino UNO r3 /* switch  *   * Each time the input pin goes from LOW to HIGH (e.g. because of a push-button  * press), the output pin is toggled from LOW to HIGH or HIGH to LOW.  There's  * a minimum delay between toggles to debounce the circuit (i.e. to ignore  * noise).    *  * David A...

how to make an automatic faucet

Image
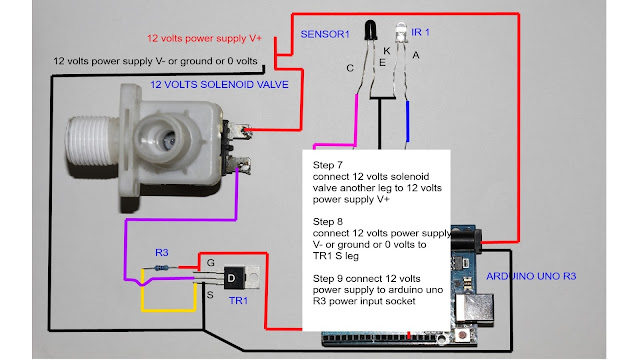
Now you will not forget to close your faucet or waste water when you pick a soap to wash your hand or face. This project shows you how to make an automatic faucet, you can even use the faucet that water valve damage because of this circuit use solenoid valve to control water. Electronic components you need: 1 Arduino Uno R3 1 TR1 = IRF 540n N channel MOSFET 1 Sensor1 = IR sensor 1 IR1 = IR led R1 = 10 kilo-ohms R2 = 100 ohms R3 = 4.7 kilo-ohms 1 12 volts solenoid valve 12 volts 1 Ampere adapter The Arduino code is very simple and you don't need to load any special module to make this project works  created 29 Dec. 2008  modified 9 Apr 2012  modified 20 Oct 2017 by easyandworkproject.xyz  by Tom Igoe  This example code is in the public domain.  */ // These constants won't change.  They're used to give names // to the pins used: const int analogInPin = A0;  // Analog input pin that the ir sensor is attached ...

Arduino project | how to make a contactless thermometer

Image
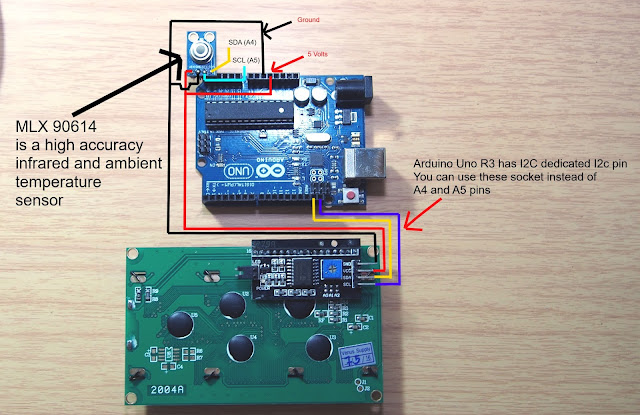
This Arduino project: a contactless thermometer is good for anyone who wants to measure temperature from any object without touching it. The infrared sensor detects infrared radiation that is emitted from an object and converts the value to digital data and sent the data to the Arduino board via an I2C interface.  The sensor I use in this project is mlx90614, an infrared and ambient temperature sensor. It can measure a wide range of temperature from -70 to 380 °C for object temperature  reading  and the sensor also measure ambient temperature from -40 to 125°C.  Mlx90614 module read an object temperature and ambient temperature and sends both outputs at the same time.  The sensor module cost around 3 - 4 $ from eBay free shipping   worldwide!!! All you need for this project are Arduino unoR3,mlx90614 module,20x4 I2C display, and jumper wire. Below is the temperature sensor wiring diagram:   MLX90614 wiring diagram ...