Arduino project | how to make a contactless thermometer
This Arduino project: a contactless thermometer is good for anyone who wants to measure temperature from any object without touching it. The infrared sensor detects infrared radiation that is emitted from an object and converts the value to digital data and sent the data to the Arduino board via an I2C interface.
The sensor I use in this project is mlx90614, an infrared and ambient temperature sensor. It can measure a wide range of temperature from -70 to 380 °C for object temperature reading and the sensor also measure ambient temperature from -40 to 125°C.Mlx90614 module read an object temperature and ambient temperature and sends both outputs at the same time.
The sensor module cost around 3 - 4 $ from eBay free shipping worldwide!!!
All you need for this project are Arduino unoR3,mlx90614 module,20x4 I2C display, and jumper wire.
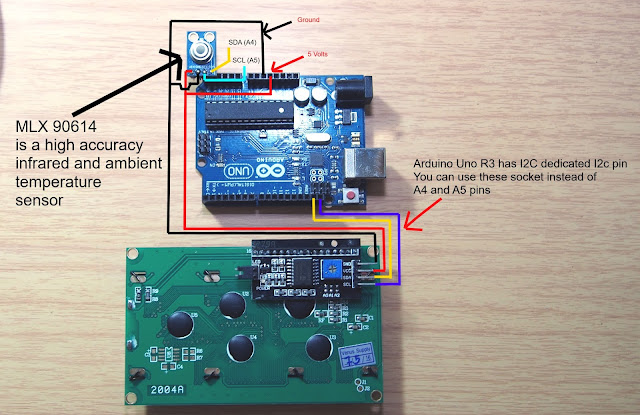
Below is the temperature sensor wiring diagram:

MLX90614 wiring diagram
VDD ------------------ 3.3V
VSS ------------------ GND
SDA ------------------ SDA (A4 on older boards)
SCL ------------------ SCL (A5 on older boards)
Arduino Code:
Before doing anything you must download the library first and add it to yourArduino software (IDE)
Code start here.
Code start here.
/******************************************************************************
MLX90614_Serial_Demo.ino
Serial output example for the MLX90614 Infrared Thermometer
This example reads from the MLX90614 and prints out ambient and object
temperatures every half-second or so. Open the serial monitor and set the
baud rate to 9600.
Hardware Hookup (if you're not using the eval board):
MLX90614 ------------- Arduino
VDD ------------------ 3.3V
VSS ------------------ GND
SDA ------------------ SDA (A4 on older boards)
SCL ------------------ SCL (A5 on older boards)
A LED can be attached to pin 8 to monitor for any read errors.
Jim Lindblom @ SparkFun Electronics
October 23, 2015
https://github.com/sparkfun/SparkFun_MLX90614_Arduino_Library
Modified by www.easyandworkproject.XYZ
October 4, 2016
Development environment specifics:
Arduino 1.6.5
SparkFun IR Thermometer Evaluation Board - MLX90614
******************************************************************************/
#include <Wire.h> // I2C library, required for MLX90614
#include <SparkFunMLX90614.h> // SparkFunMLX90614 Arduino library
#include <LiquidCrystal_I2C.h>
LiquidCrystal_I2C lcd(0x3F, 20, 4);
IRTherm therm; // Create an IRTherm object to interact with throughout
const byte LED_PIN = 8; // Optional LED attached to pin 8 (active low)
void setup()
{
Serial.begin(9600); // Initialize Serial to log output.
therm.begin(); // Initialize thermal IR sensor
therm.setUnit(TEMP_C); // Set the library's units to Farenheit
// Alternatively, TEMP_F can be replaced with TEMP_C for Celsius or
// TEMP_K for Kelvin.
lcd.begin();
pinMode(LED_PIN, OUTPUT); // LED pin as output
setLED(LOW); // LED OFF
}
void loop()
{
setLED(HIGH); //LED on
// Call therm.read() to read object and ambient temperatures from the sensor.
if (therm.read()) // On success, read() will return 1, on fail 0.
{
// Use the object() and ambient() functions to grab the object and ambient
// temperatures.
// They'll be floats, calculated out to the unit you set with setUnit().
Serial.print("Object: " + String(therm.object(), 2));
Serial.write('°'); // Degree Symbol
Serial.println("C");
Serial.print("Ambient: " + String(therm.ambient(), 2));
Serial.write('°'); // Degree Symbol
Serial.println("C");
Serial.println();
lcd.setCursor(0, 0);
lcd.print("Infrared Thermometer");
lcd.setCursor(0, 3);
lcd.print("Object : " + String(therm.object(), 2));
lcd.print(" ");
lcd.print("C");
lcd.setCursor(0, 2);
lcd.print("Ambient: " + String(therm.ambient(), 2));
lcd.print(" ");
lcd.print("C");
}
setLED(LOW);
delay(500);
}
void setLED(bool on)
{
if (on)
digitalWrite(LED_PIN, LOW);
else
digitalWrite(LED_PIN, HIGH);
}
------------------------------------------------------------
I add code that makes you read a value from a 20x4 i2c display so you can read a value from LCD or from your computer via the serial monitor.
Enjoy the DIY world!!!


How to do with two MLX90614?
ReplyDeleteI have only one sensor, you can find the answer here
Deletehttp://forum.arduino.cc/index.php?topic=54170.0
is it okay to use a 1602A i2c lcd module?
ReplyDelete